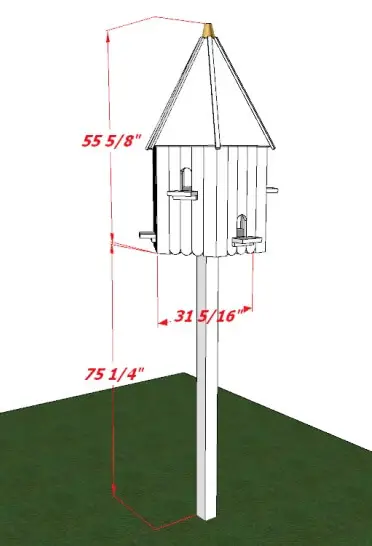
If you’re looking to build your own Dovecote this article explains exactly how to build the stunning Dovecote pictured below.
The total cost for this build not including tools should stand at around $100 and it will take an estimated 8 hours to build.
Recommended Tools:
- Mitre saw
- Circular saw
- Drill
- Screw drive
- Tape measure
- Pencil
- Safety glasses
- Spirit level
| Estimated cost: | Estimated build time: |
|---|---|
| $100 (prices will vary depending on your location) | 8 hours |
Dovecote Plans PDF
If you’d prefer to download and print off a PDF off our Dovecote plans and cut list so you have a working copy then you can do so by clicking the button below:
Dovecote Cut List
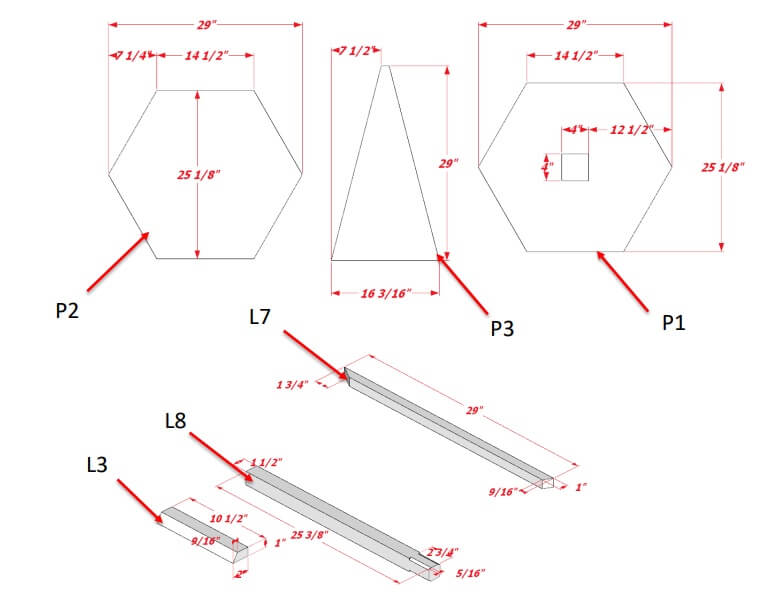
Ensure that you have all the lumber and plywood listed below cut to the correct size before you start assembling the Dovecote.
| Name | Material | Property | L (inches) | W (inches) | Quantity | Note |
|---|---|---|---|---|---|---|
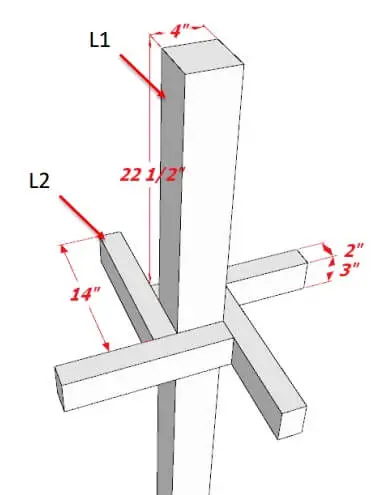
| L1 | Lumber 4×4 | 25 1/4″ | 1 | Post | ||
| L2 | Lumber 3×2 | 14″ | 4 | Bottom frame | ||
| L3 | Lumber 2×1 | Angle Cut | 10 1/2″ | 24 | Wall frame | |
| L4 | Lumber 2×1 | 10 1/2″ | 12 | Wall frame | ||
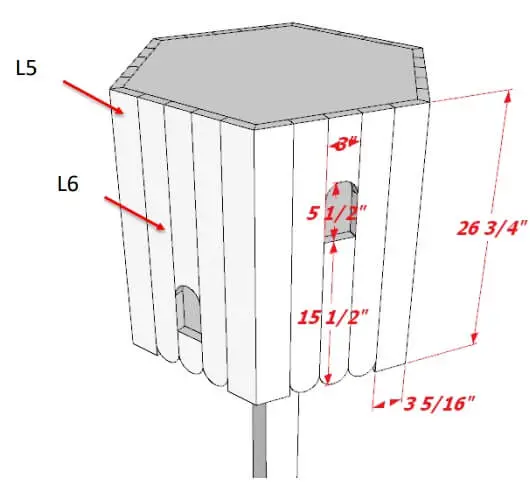
| L5 | Lumber 4×1 | Angle cut to 3 5/16″ | 26 3/4″ | 12 | Siding | |
| L6 | Lumber 3×1 | 26 3/4″ | 18 | Siding | ||
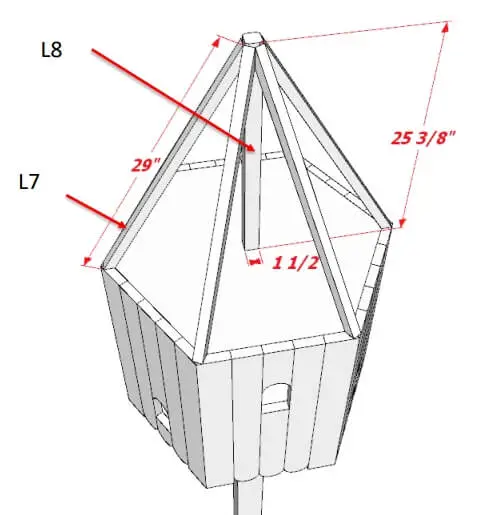
| L7 | Lumber 1×1 | Two angle cuts | 29″ | 6 | Roof frame | |
| L8 | Lumber 1 1/2×1 1/2 | Cut chamfers | 25 3/8″ | 1 | Roof frame | |
| L9 | Lumber 4×1 | 6″ | 6 | Entry plate | ||
| L10 | Lumber 1×1 | 6″ | 6 | Entry plate | ||
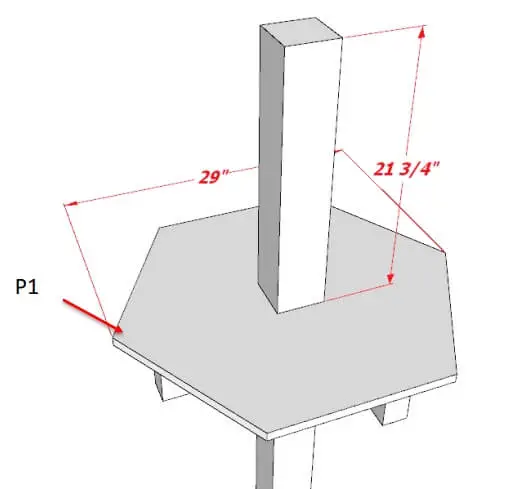
| P1 | Plywood 3/4 | Angle cuts, hole cut | 29″ | 25 1/8″ | 2 | Floor |
| P2 | Plywood 3/4 | Angle cuts | 29″ | 25 1/8″ | 1 | Ceiling |
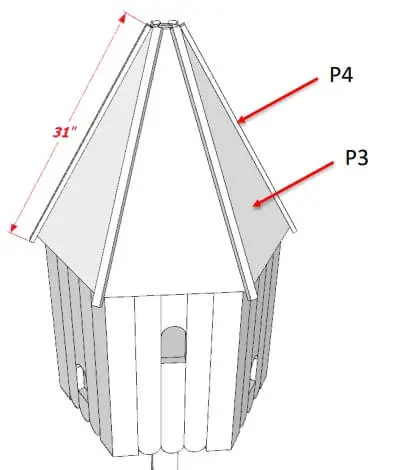
| P3 | Plywood 9/16 | Angle cuts | 29″ | 16 3/16″ | 6 | Roof covering |
| P4 | Plywood 9/16 | 31″ | 6 | Roof covering | ||
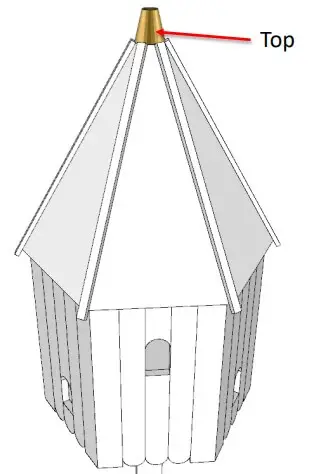
| Top | Wood | ø3 1/2″ | 1 |
Dove House Building Plans – Step By Step Visual Guide:
1. Build The Frame
Create the frame using the 2”x3” lumbers (L2) on the 4”x4” post (L1). Use 3” screws or nails to fit it together.
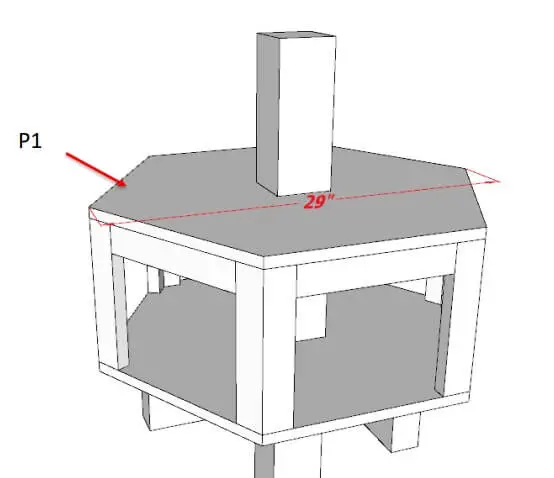
2. Add The Floor
Use the ¾ plywood panel (P1) to put the first floor in place. Use 1 1/2” screws or nails to secure it.
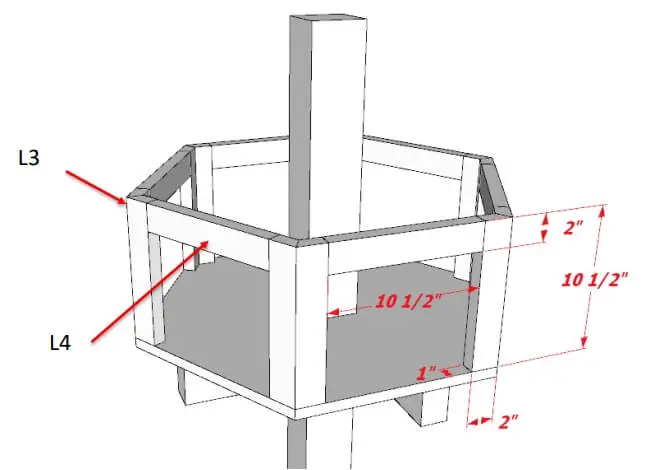
3. Attach The Wall Framing
Create the wall framing using the 2×1 lumbers (L3 & L4). Use 1 1/2” screws or nails to secure.
4. Add The 2nd Floor
Use ¾ plywood panel (P1) to create the second floor. Use 1 1/2” screws or nails to secure.
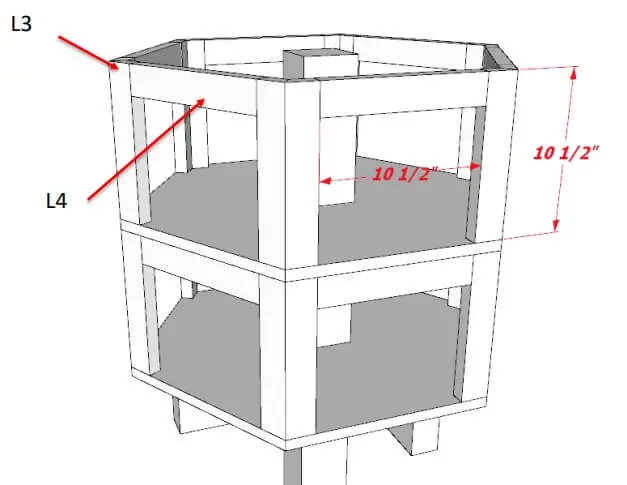
5. Attach More Wall Framing
Create the second-floor wall framing using 2×1 lumbers (L3 & L4). Use 1 1/2” screws or nails to secure.
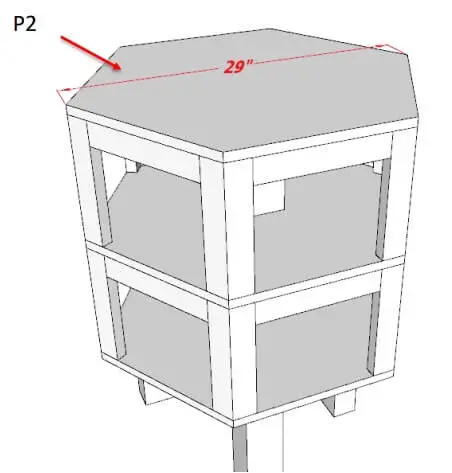
6. Fit The Ceiling
Use ¾ plywood panel (P2) to set the ceiling. Use 1 1/2” screws or nails to secure it in place.
7. Add Siding & Cut Entry Holes
Add the siding (L5 & L6) and cut entry holes to allow doves/pigeons to exit & enter. Use 1 1/2” screws or nails to secure the siding in place.
8. Create Roof Framing
Create the roof framing using the 1” (L7) and 1 ½” (L8) lumbers. Use 1” screws or nails to secure.
9. Fit Roof Covering
Add 9/16 plywood (P4 & P3) to the roof to create the roof covering. Secure using 1” screws or nails.
10. Fit Wooden Top To Roof
Secure the roof topper in place.
11. Add A Waterproof Membrane
As an Amazon Associate I earn a small fee from qualifying purchases made through Amazon links. This helps us run the site – thanks for your support!
There are a number of ways you can waterproof your dovecote, we recommend:
- First painting it using a waterproof sealant such as this.
- Then fitting felt roof tiles for a visually pleasing and long-lasting finish.
12. Create Entry Plates
Finally, create the entry plates using the 4×1” (L9) and 1” (L10) lumbers. Use 1 1/2” screws or nails to secure.

Enjoy Your New Dovecote!
It’s done and should look something like this:
We hope you enjoy it as much as the pigeons and doves will no doubt enjoy making their home in it.
Also Read: